St. Augustine grass is the king of Florida lawns – it’s a lush, wide-bladed turf that loves our warm, humid weather and sandy soil. But even this hardy grass has its share of issues, especially in South Florida’s unique climate. From pesky insects to sneaky fungi (and even a virus!), your St. Augustine lawn can face many challenges.
The good news is that with a little knowledge and some DIY elbow grease, you can prevent or overcome most of these problems. Below, we’ll dive into the most common issues affecting St. Augustine lawns in Florida and explain what they are, why they happen, how to prevent them, and how to treat them.
Whether you’re a homeowner looking to up your lawn-care game or a DIY enthusiast tackling your own yard, this guide will help you keep your St. Augustine grass green and gorgeous. Let’s get started!
Table of Contents
Chinch Bugs
Identifying Chinch Bug Damage
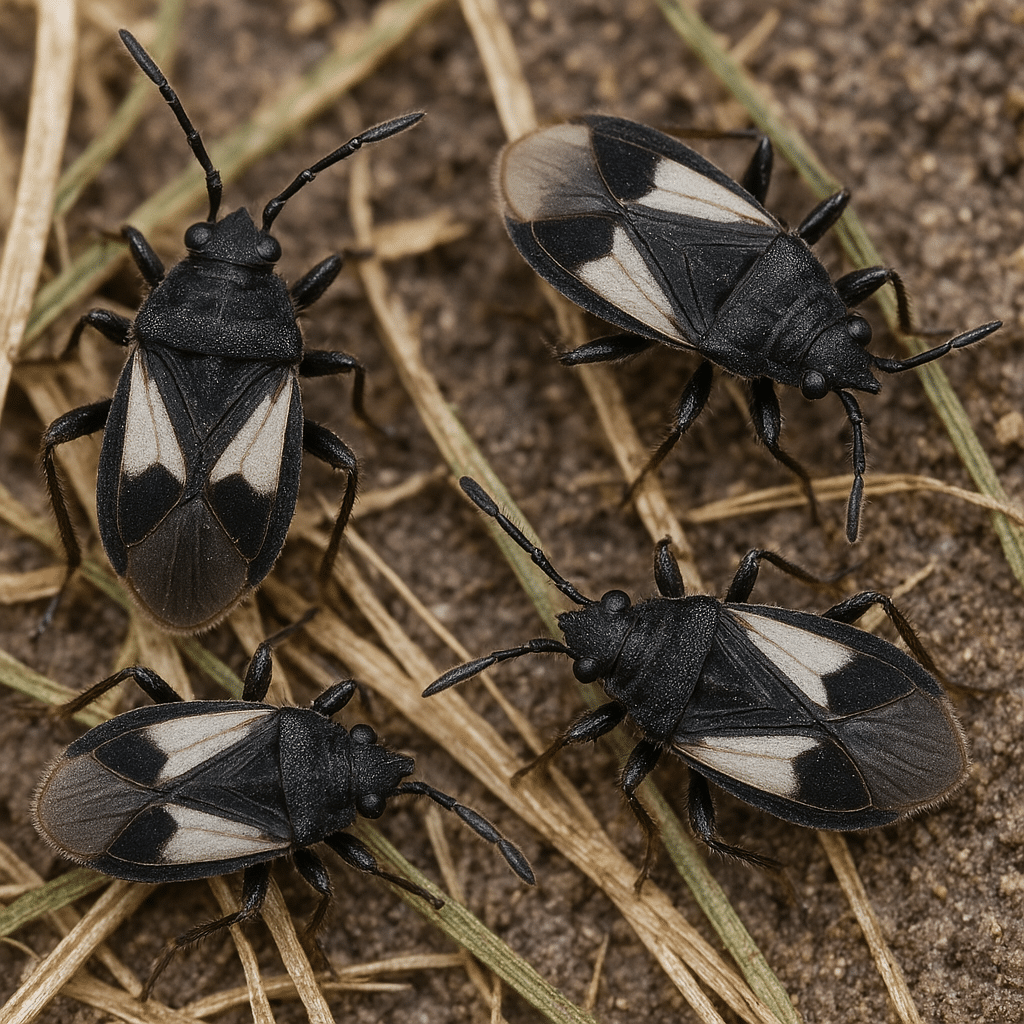
Chinch bugs are tiny black and white insects (about the size of a grain of rice) that literally suck the life out of St. Augustine grass. They feed by inserting their needle-like mouthparts and draining juices from the grass blades and stems, injecting a toxin as they go.
The first signs of chinch bug damage are usually patches of yellowing grass that turn brown and die. These patches often start in hot, sunny areas of the lawn near sidewalks or driveways (the heat-stressed spots) and spread outward. It’s easy to mistake chinch bug damage for drought or sun scorch because the grass looks dry and crispy.
If your lawn stays brown even after watering, or the patches keep growing, chinch bugs might be the culprits.
Why Chinch Bugs Invade and Favorable Conditions
Southern chinch bugs thrive in warm weather and are active almost year-round in South Florida. They especially love hot, dry lawns – when your grass is stressed from drought or lack of nutrients, it’s an all-you-can-eat buffet for chinch bugs. Lawns with thick thatch (the layer of undecomposed grass between soil and grass blades) also harbor chinch bugs, since they hide in thatch for shelter.
In Florida, chinch bug activity often peaks in the summer months when temperatures are high. However, in mild winters, they can still be chewing away.
Floratam St. Augustine (a popular variety in Florida) was actually developed to resist chinch bugs, but over time even Floratam has become susceptible as new chinch bug strains emerged. So no St. Augustine lawn is completely safe without proper care.
Preventing Chinch Bug Infestations
The best way to deal with chinch bugs is to prevent them or catch them early before they wreak havoc. Here’s how you can keep these pests at bay:
Keep Your Lawn Healthy: A vigorous lawn resists pests better. Water the grass deeply but infrequently to avoid drought stress (more on watering later). Mow at the recommended height (about 3–4 inches for St. Augustine) to encourage deep roots and a thick turf. Feed your lawn appropriately – don’t overdo it on nitrogen fertilizer, but ensure the grass isn’t nutrient-starved either.
Avoid Dry, Stressed Spots: Pay extra attention to areas along pavement or that get full sun all day. These spots dry out faster. Make sure your sprinklers hit these zones, and consider hand-watering them in extreme heat. A well-hydrated lawn is less inviting to chinch bugs.
Dethatch If Needed: If you have more than about 1/2 inch of thatch, remove it with a rake or mechanical dethatcher. Reducing thatch eliminates chinch bug hiding places and also promotes healthier grass. You don’t need to dethatch every year – just when thatch builds up excessively.
Resistant Grass Varieties: If you’re planting new sod or plugs, look for St. Augustine cultivars with some chinch bug resistance. Floratam had resistance (though it’s not foolproof now), and there are newer varieties in development. While not immune, they might slow an infestation’s spread.
Treatment and Control of Chinch Bugs in St. Augustine Lawns
If you confirm chinch bugs are already munching on your lawn, prompt treatment can save your grass. First, identify them to be sure chinch bugs are the issue – get down and part the grass at the edge of a brown patch. You might see the little black adults scurrying away or tiny red/orange nymphs (the young ones) with a white band across their backs.
Another detection trick is the coffee can flush: remove both ends of a coffee can, push it a couple of inches into the soil at the border of a dead patch and green grass, fill it with soapy water, and see if chinch bugs float up. Once you’ve spotted them, here’s how to get rid of them:
Organic Options: For a light infestation, you could start with eco-friendly approaches. Spraying insecticidal soap or neem oil on the affected areas may kill some chinch bugs on contact (ensure any product is safe for lawns). Diatomaceous earth, a natural powder, can be sprinkled in the thatch; it scratches and dehydrates insects (effective when dry, but less so after rain or irrigation). Also, some lawn enthusiasts use beneficial nematodes – microscopic worm-like organisms that prey on soil-dwelling pests – which might help reduce chinch bug populations. These organic methods can help, but they often work slower and might not wipe out a large infestation.
Chemical Insecticides: Most homeowners battling chinch bugs opt for lawn insecticides. Look for products labeled for chinch bug control on St. Augustine grass. Common effective ingredients include bifenthrin, permethrin, or imidacloprid, among others. You can choose liquid concentrates to spray or granular formulas to spread with a broadcast spreader. Follow the label directions carefully – usually you’ll treat the damaged areas and a buffer around them (since chinch bugs move outward into fresh grass). Water the lawn lightly after applying granular insecticide to activate it. For example, a product containing bifenthrin (often sold as “lawn bug killer granules”) can provide quick knockdown. Imidacloprid (found in some “season-long” grub killers that also list chinch bugs) can serve as a longer-lasting systemic control. Pro tip: If using liquid spray, do it in early morning or late afternoon when the bugs are more sheltered in the thatch and less active – you want the chemical to reach them. And as always, keep kids and pets off the treated lawn until it’s dry.
Repeat and Rotate: Chinch bugs can develop resistance to chemicals over time. If you had a big outbreak and knocked it down, you might need to treat again in a few weeks if stragglers survived. It’s wise to rotate insecticide classes (check labels for the active ingredient) so you’re not using the same mode of action repeatedly. This helps prevent the chinch bugs in your area from becoming superbugs. Also, continue to monitor your lawn closely the rest of the season. Catching any reinfestation early is key.
With vigilance and the right approach, you can stop chinch bugs from turning your St. Augustine lawn into a patchwork of dead grass. Once controlled, keep up with good lawn practices to prevent their return.
Sod Webworms and Armyworms
What Are Sod Webworms and How to Spot Them
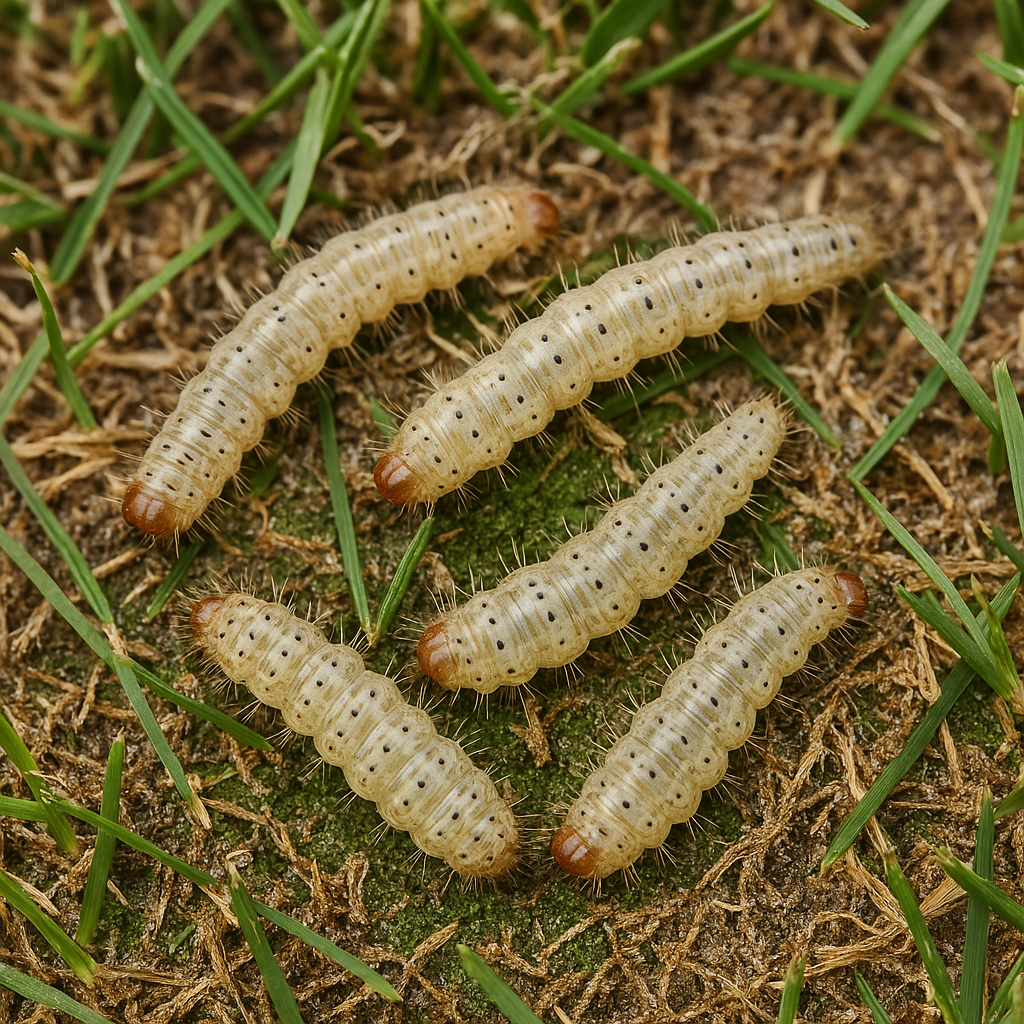
If you notice small brown or gray moths fluttering up from your grass in the evening or when you walk across the lawn, that’s a sign of tropical sod webworms or armyworms in your lawn. The moths themselves don’t damage the grass – it’s their hungry caterpillar larvae that do the real feeding.
Tropical sod webworms are a very common caterpillar pest of St. Augustine grass (and other warm-season lawns) in Florida.
Armyworms (like fall armyworms) are a close cousin; they’re a bit larger caterpillars that can also invade lawns occasionally. These pests chew on grass blades, often at night, leaving your lawn looking like it got a bad haircut.
Early signs include grass blades with notches or chewed edges and areas that appear thinner or ragged. You might see green pellet-like droppings (frass) on the soil surface. With a heavy infestation, parts of the lawn can look almost scalped or browning out as the caterpillars munch through the foliage.
Sod webworm damage often shows up as small brown patches a few inches across that can rapidly expand if not treated. Armyworms tend to cause larger areas of damage quickly (hence the name “army” – they move in large numbers).
Sod Webworm Life Cycle and Favorable Conditions
In South Florida, tropical sod webworms can have multiple generations a year. The adult moths lay eggs in the grass, which hatch into tiny green caterpillars. These larvae initially “windowpane” the grass – meaning they eat the soft green parts of the blade, leaving a transparent film or the veins, so the blade looks skeletonized. As they grow (each stage is called an instar), they turn brownish-green and become more voracious, eventually eating entire sections of grass blades.
They typically hide in the soil and thatch layer during the day (often rolled up in a little silk-lined tunnel in the thatch) and come out to feed at night. They prefer warm conditions and tend to be most active in late summer and fall (July through October is prime time for sod webworm outbreaks in Florida), but they can appear anytime it’s warm. Armyworms (like the fall armyworm) often blow in or migrate to Florida in late summer as well and can cause damage in early fall.
Hot, dry weather can favor these pests because it stresses the grass and also can suppress some natural diseases that might keep caterpillars in check. Additionally, a lawn with heavy thatch or recently laid sod can be more vulnerable (the moths love to lay eggs in thick thatch, and new sod farms often have webworm issues that can hitchhike to your yard).
Preventing Sod Webworms in St. Augustine Grass
Keeping your lawn healthy and less attractive to these leaf-munchers is the first line of defense. Here’s how to prevent sod webworms and armyworms from overtaking your St. Augustine grass:
Manage Thatch: Since webworm larvae hide in the thatch, try not to let a thick mat build up. If your lawn has accumulated a lot of dead material, consider an occasional dethatching or verticutting (vertical mowing). Even raking the lawn vigorously can pull up some thatch. Removing excess thatch makes the environment less cozy for the caterpillars and also helps water and nutrients penetrate the soil better.
Mow and Water Properly: Mow at the recommended height (around 3–4 inches for St. Augustine) and don’t scalp the lawn – scalping can invite egg-laying. Water deeply but infrequently to maintain strength; oddly enough, these pests prefer drier, under-fertilized turf because the grass isn’t growing fast and can’t outgrow the feeding damage. However, avoid overwatering and overfertilizing (which leads to thatch buildup). Aim for balanced maintenance.
Watch for Moths: Keep an eye out for those adult moths flitting around at dusk, especially in late summer. A few moths are normal, but if you see clouds of them each evening, that’s a red flag. It can be worth doing a closer inspection of the grass if you notice many moths or birds eagerly pecking at the lawn (birds often feast on the larvae).
Resistant Grass and Diversity: There aren’t specific sod webworm–resistant St. Augustine varieties widely touted, but maintaining biodiversity in your landscape (like flowering plants that attract beneficial insects) can help. Parasitic wasps and other predators can naturally reduce caterpillar populations. Encourage a healthy garden ecosystem that supports these beneficial bugs.
Treatment for Sod Webworms
If sod webworms or armyworms have already launched an attack, don’t panic – they’re very treatable. The key is acting quickly once you confirm an infestation, because these larvae can chow down fast. Here’s how to control them:
Organic and Natural Solutions: One of the safest and effective treatments for caterpillar pests is Bacillus thuringiensis (Bt). Bt is a naturally occurring soil bacterium that, when applied to the lawn (usually sold as a liquid or dust), is ingested by the feeding caterpillars and fatally upsets their stomach. It’s selective to caterpillars and won’t harm people, pets, or beneficial insects (as long as those beneficials aren’t caterpillars). Apply Bt in late afternoon or early evening, since these larvae feed at night – that way they’ll ingest the fresh Bt on the grass blades. Another organic option is spinosad, a natural soil-derived compound that is used in some lawn insect products; it’s also very effective against caterpillars and slightly broader spectrum (can kill some other pests too). Spinosad can be found in products labeled for webworm or caterpillar control and is often safe for residential use. Beneficial nematodes (yes, them again) can also target webworm larvae in the soil – if you go this route, look for nematode species like Steinernema or Heterorhabditis that mention lawn caterpillars on the label. Apply them to moist soil in the evening.
Synthetic Insecticides: There are plenty of lawn insecticides that will quickly knock out webworms and armyworms. Look for ingredients like bifenthrin, permethrin, lambda-cyhalothrin, or carbaryl in granular or liquid form. Many “all-purpose” lawn bug granules (the kind that also kill chinch bugs, ants, etc.) will list sod webworms and armyworms as targets. For example, Scotts® Turf Builder SummerGuard or Spectracide® Triazicide are products homeowners use for surface-feeding lawn pests. Spread granules and water them in, or spray liquids per label directions. These chemicals provide quick contact kill. You might actually see caterpillars come to the surface as they’re dying after a treatment.
Application Tips: Treat in the early evening if possible. Since sod webworms feed at night, you want the insecticide fresh when they start chewing. Also, treat not just the visibly damaged area but a bit beyond, since those caterpillars might have crawled further or new ones might be hatching. If using Bt or spinosad, you might need a follow-up application a week later, as these are most effective on younger larvae and won’t kill eggs (you want to catch any late hatchlings). For synthetic insecticides, one treatment is often enough, but heavy infestations could warrant a second round in about 2-3 weeks if you still see signs of feeding.
Lawn Recovery: After the invasion is over, help your lawn rebound. Water it adequately and consider a light feeding (unless it’s the heat of summer – don’t fertilize in mid-summer in Florida as it can invite different types of fungus; wait for early fall if so). St. Augustine spreads via stolons (above-ground runners), so with proper care it will creep back into damaged areas. If the damage was very severe, you might need to patch in some sod or plugs, but often the grass will fill in by itself over time.
With these measures, sod webworms and armyworms can be defeated. The key takeaway is to stay observant – a watchful lawn owner will notice small problems before they become big bare patches. If you do, these caterpillars won’t stand a chance.
Grubs
What Are Grubs and How to Recognize the Problem
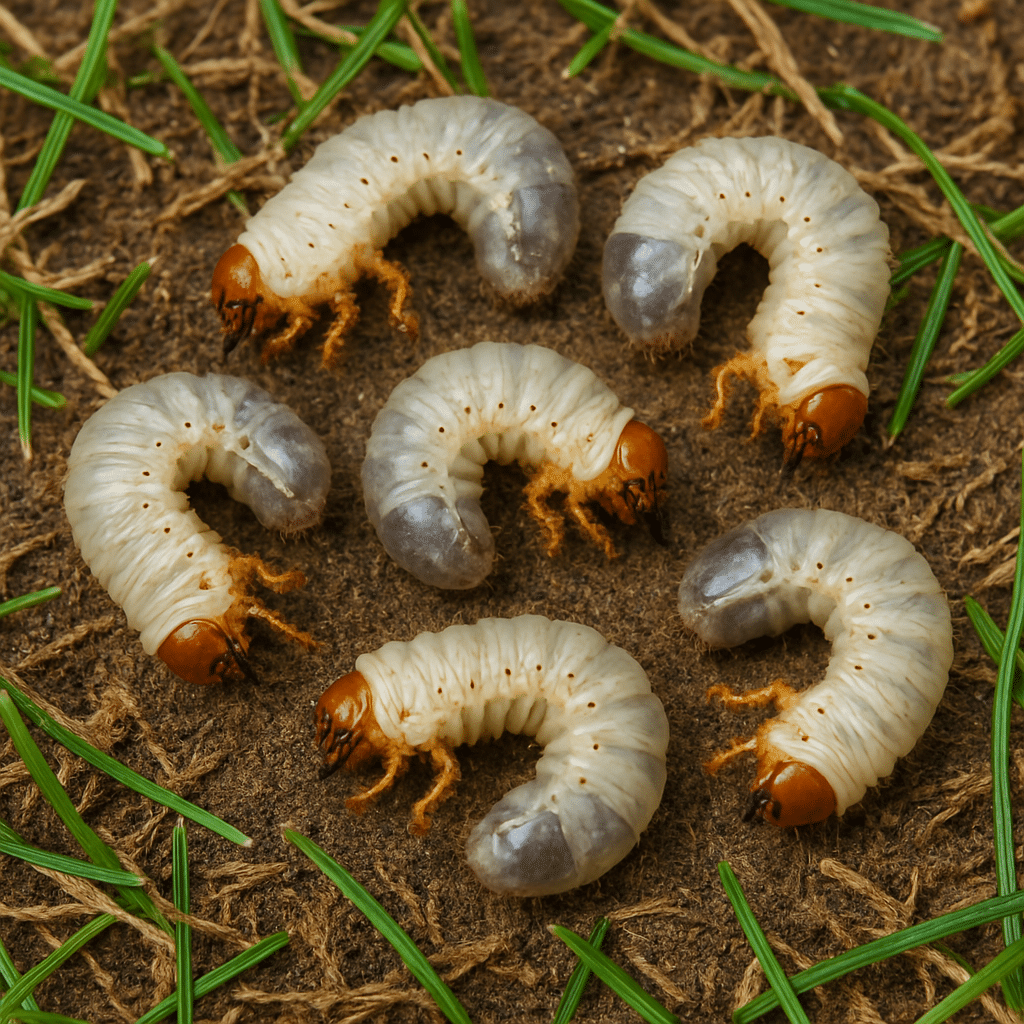
“Grub” is the common name for the chubby, C-shaped white larvae of various beetles that live in the soil. In Florida lawns, grubs are often the offspring of beetles like June beetles, masked chafers, or even invasive species like Japanese beetles (though Japanese beetles are less common in South Florida).
Grubs themselves are off-white, plump worms with brownish heads and six little legs near the front of their body. They live underground and chew on grass roots. A few grubs aren’t a big deal, but when there are a lot, they can sever so many roots that your St. Augustine grass can’t take up water, causing it to wilt and die in patches. You might notice sections of turf that feel soft or spongy underfoot, or grass that mysteriously turns brown even when watered.
A classic sign of grub damage is that the grass pulls up easily from the soil, almost like a loose carpet, because the roots have been eaten. Another hint can be increased animal activity: if you see raccoons or armadillos digging up your lawn at night or lots of birds pecking and scratching, they might be feasting on a grub buffet below the surface.
What Causes Grub Infestations in St. Augustine Lawns?
In Florida, the life cycle of common lawn grubs generally goes like this: adult beetles emerge in late spring or summer (some species are active as early as May, others mid-summer), they mate and lay eggs back into the lawn soil. The eggs hatch into tiny grubs that start feeding on grassroots.
These grubs typically are most actively feeding in late summer into fall, when they’re fattening up. In cooler parts of the country, grubs then dig deeper and go dormant in winter, but in South Florida’s warm climate, some grub species might continue feeding to some extent year-round or have staggered life cycles. However, our sandy soils dry out in winter, which can naturally limit grub activity. Grubs tend to be worse in irrigated lawns because beetles seek out moist soil and lush grass to lay eggs (easier for the young to survive).
Lawns that are well-watered in summer can inadvertently attract more egg-laying beetles than dry, non-irrigated areas. Each beetle species has its preference – for instance, masked chafer beetles and others often swarm on warm summer nights. If you had a big June beetle flight around your porch lights, their grubs might show up a few weeks later in the lawn. Sandy soil (like most South Florida yards) is actually favorable to some grubs like the ox beetle grub, because it’s easy to burrow in.
Preventing Grubs in Your St. Augustine Lawn
The best approach to grubs is to nip them in the bud before they cause serious damage. Here’s how to prevent or minimize grub problems in your St. Augustine lawn:
Healthy Lawn, Healthy Roots: A robust root system can tolerate a few grubs without issue. Keep your St. Augustine healthy with proper watering, mowing, and feeding so it can outgrow minor root nibbling. Avoid overwatering in summer – not only can it lead to disease, but as mentioned, consistently wet soil invites beetles to lay eggs. Water deeply but allow the surface to dry slightly between waterings; this can discourage egg-laying because beetles prefer moist topsoil.
Timing Preventative Treatments: If grubs are a known issue in your area or you’ve had them before, consider applying a preventative grub control in early summer. Products with imidacloprid, chlorantraniliprole, or thiamethoxam (often marketed as season-long grub preventers) can be applied June-July in South Florida to kill grubs as they hatch and while they are small. Chlorantraniliprole (found in Scotts® GrubEx for instance) is a newer preventative that is very effective and has a long residual. Applying it mid to late spring (before you see damage) can dramatically reduce any grub populations.
Don’t Attract Beetles: This one’s tricky, but if possible, reduce outdoor lighting during peak beetle flight season (usually early summer evenings) because lights attract adult beetles. Also, if you have a compost pile or lots of organic debris, keep it well-managed – some beetles are drawn to lay eggs in rich organic soil. These steps are minor, but every little bit helps.
Monitor and Inspect: At least once or twice each year (late summer is ideal), do a grub check. Cut a one-foot square piece of sod in a brown-looking area and peel it up to inspect the soil underneath. If you see a few grubs (like 1-5) in that one-square-foot section, that’s normal and not a big issue. If you count 10, 20, or more, that’s an infestation that likely needs treatment. Checking helps you catch a problem before the lawn is seriously hurt.
Treatment for Grubs
If you’ve confirmed a grub infestation (or you just want to proactively ensure they don’t get a foothold), there are several treatment routes to consider:
Biological Control (Beneficial Nematodes/Milky Spore): For a natural approach, you can apply beneficial nematodes to your lawn. These are microscopic organisms that hunt down grubs in the soil. Products often contain species like Heterorhabditis bacteriophora or Steinernema; they are mixed with water and sprayed or drenched into the lawn. Nematodes are most effective when soil is warm and moist (late spring through early fall). They can provide decent control if applied properly, but be sure to buy fresh, live nematodes from a reputable source for best results. Another biological option is Milky Spore disease (Paenibacillus popilliae), but note: milky spore only affects Japanese beetle grubs, which are not the most common grub in South Florida. So milky spore is not usually the go-to in Florida lawns.
Curative Insecticides: If grubs are actively feasting (you see damage and find medium to large-sized grubs in the soil), a curative insecticide is the fastest solution. Look for products containing trichlorfon or carbaryl – these act quickly to kill grubs on contact. An example is Dylox® (trichlorfon) which works within days to wipe out grubs. Always apply these exactly as directed; typically you’ll need to water them in thoroughly to move the product down to where the grubs are. Another effective active ingredient for a quick kill is carbaryl (Sevin®), though some formulations of Sevin for lawns have changed, so check the label. Keep in mind, these chemicals are a bit harsher and don’t last long in the soil (which is why they kill fast), so they’re used for rescue treatments, not prevention.
Preventative Insecticides: As mentioned in prevention, if you didn’t apply one earlier and you’re now heading into late summer with grub concerns, you can still apply products like chlorantraniliprole (GrubEx) or imidacloprid. They’ll kill young grubs and also help protect against any new ones. Chlorantraniliprole is very safe for beneficial insects compared to older chemicals, which is a plus for your lawn’s ecosystem. The downside is it works best on small, newly hatched grubs, so if your grubs are already large, pair this with a curative or use a different approach.
Repair and Recovery: After treating for grubs, you might still have some lawn recovery to do. Lightly rake out the dead patches and water the lawn to encourage surrounding St. Augustine runners to creep back in. Fall (around September/October in South Florida) is a good time to give your lawn a balanced fertilizer if it’s grub-damaged, as it will help it regrow roots and blades before winter. If damage is severe, you may need to lay some sod patches or plugs in the largest dead areas. Also, be vigilant the next year – if you had a lot of grubs, the beetles will likely return, so plan a preventative treatment in early summer next year to break the cycle.
By staying alert and treating early, you can keep grubs from turning your lawn into a patchy mess. A little proactive care goes a long way to ensure those root-munchers don’t stand a chance.
Gray Leaf Spot
Identification and Symptoms of Gray Leaf Spot in St. Augustine Lawns
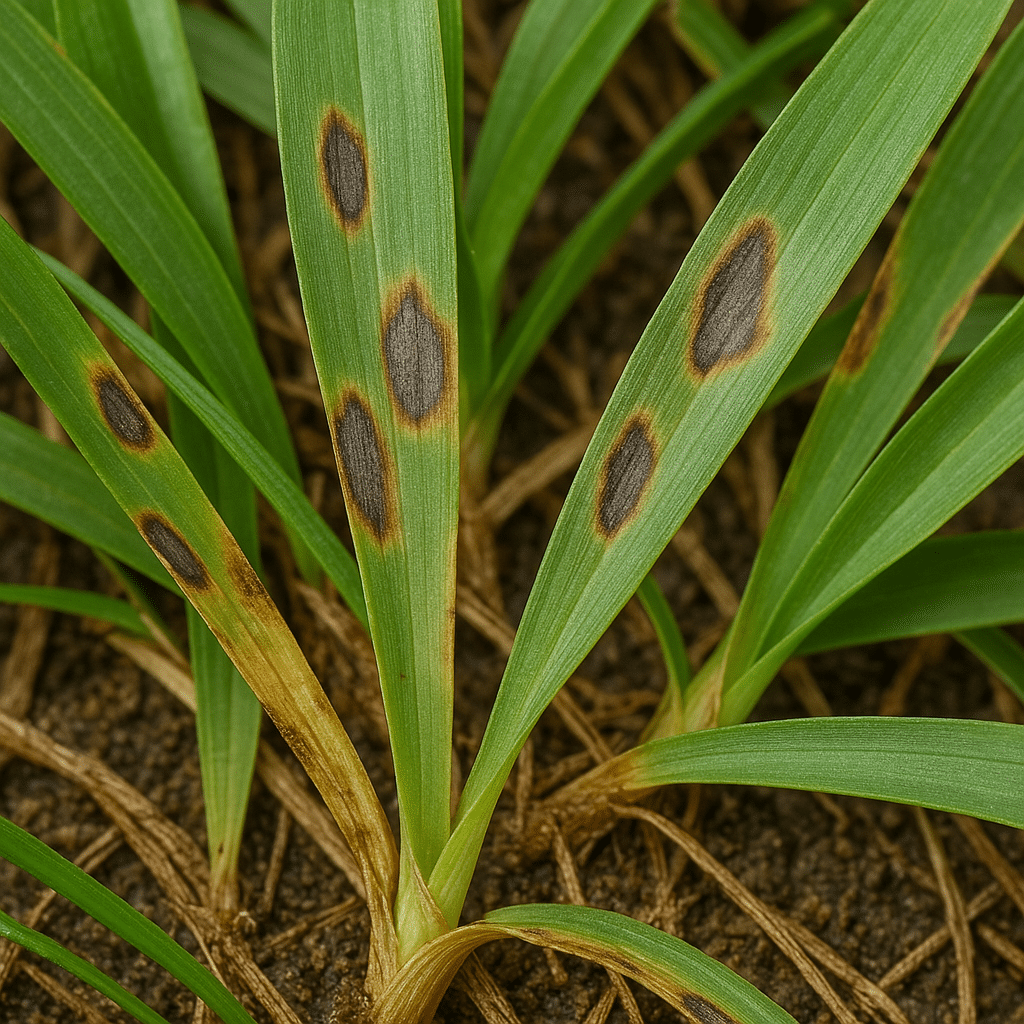
Gray leaf spot is a fungal disease that often plagues St. Augustine grass, especially during Florida’s steamy summers. It’s caused by a fungus (named Pyricularia grisea, if you’re feeling scientific) that attacks the grass blades. If your St. Augustine lawn has small brownish or ash-gray spots on the leaves, you could be dealing with gray leaf spot.
These spots often start as tiny pinhead-sized specks and then expand into oval or elongated lesions about the size of a grain of rice or bigger. The lesions might have a gray center (hence the name) with a dark brown or purple border. Sometimes the center of the spot looks fuzzy or moldy, especially in the early morning when there’s dew – that’s the fungus sporulating.
As the disease progresses, many spots can merge together, causing large blotches of dead tissue on the grass blades. A badly infected lawn will look withered or scorched, almost as if it has drought damage or fertilizer burn, but closer inspection reveals those telltale leaf spots. New growth (like the tender young shoots after fertilization or rain) is particularly vulnerable and might wither quickly when infected, giving the lawn a thin, blighted appearance.
Favorable Conditions for Gray Leaf Spot
Gray leaf spot thrives in warm, humid, and rainy conditions – sound like a Florida summer to you? Indeed, the prime time for this disease is typically the rainy season (late spring through early fall) in South Florida. High humidity and temperatures in the 80s and 90s create a perfect environment. The fungus produces spores that spread by wind and water. So when you have frequent afternoon thunderstorms or if you’re watering a lot, those droplets can splash spores from blade to blade.
Over-fertilizing with nitrogen in the summer can actually encourage gray leaf spot, because it causes a flush of tender, succulent growth that the fungus loves to attack. Likewise, if you’re watering frequently at night, the grass stays wet for hours, greatly increasing disease risk. St. Augustine grass is unfortunately quite susceptible, and varieties like ‘Floratam’ can get hit hard by gray leaf spot if conditions favor the fungus.
You might first notice the disease in shadier, moist areas of the lawn or where air circulation is poor, as those spots stay damp longer. But in a prolonged rainy spell, even open, sunny areas can get infected.
Preventing Gray Leaf Spot
Keeping gray leaf spot out of your lawn is all about smart cultural practices and timing. Here’s how you can prevent this fungus from taking hold:
Watch the Nitrogen: Avoid heavy nitrogen applications in the peak of summer. It’s tempting to keep your lawn a deep green, but too much fertilizer (especially quick-release types) in hot, humid weather fuels the fungus. Use a slow-release fertilizer formula and stick to recommended rates. In summer, consider cutting back a bit on nitrogen and maybe bumping potassium (the “K” in N-P-K) which can strengthen grass resilience. The idea is to maintain moderate growth, not a hyperspeed growth that’s fungus-prone.
Water Smart: Gray leaf spot needs leaf wetness to infect. So try to water only in the early morning hours (like 4–8 AM), which allows grass blades to dry quickly after sunrise. Avoid evening or night watering – leaving the lawn wet overnight is inviting trouble. Also water only when needed; an overwatered lawn not only stays damp but also leaches nutrients, weakening the grass. Aim for deep irrigation once or twice a week rather than daily sprinklings. Many South Florida lawns get plenty of rain in summer, so you might be able to turn off your sprinklers completely during rainy weeks.
Mow Regularly (and Clean Up): Mowing at the proper height (3–4 inches for St. Augustine) is crucial. If the grass gets too tall and dense, it can hold moisture. Keep your mower blades sharp – dull blades tear the grass, making wounds that can get infected. If you see disease symptoms, bag your clippings when you mow and throw them out, rather than mulching them back in. This can help reduce the spread of fungal spores to other parts of the lawn. Also, if possible, avoid mowing a very wet, dew-laden lawn that has gray leaf spot – you’ll just spread spores everywhere by tracking through it.
Air Flow and Sunlight: Where possible, improve air circulation and sunlight penetration to the lawn. Trim back overgrown shrubs or tree limbs that may be keeping areas of the grass wet and shaded. St. Augustine can handle some shade, but the more sun, the quicker the turf dries after rain, which helps minimize fungus. In stubborn problem spots (like the north side of a house or under dense trees), you might consistently fight leaf diseases – it could be worth considering alternative groundcovers there, or at least be extra vigilant with other preventive measures.
Treatment for Gray Leaf Spot
If gray leaf spot has already made an appearance, don’t worry, you can manage it. The sooner you act, the easier it is to halt the damage. Here are ways to treat an active gray leaf spot problem:
Adjust Lawn Care First: Before reaching for chemicals, immediately implement the preventive steps above. Stop any further nitrogen fertilization until the lawn recovers. Cut back on watering; let the lawn dry out a bit. Sometimes these steps alone can slow the disease enough for the grass to recover. Think of it as taking away the fungus’s favorite conditions.
Fungicides (Chemical Control): There are several fungicides available to homeowners that are effective against gray leaf spot. Look for products that mention gray leaf spot or leaf spot diseases on the label and are safe for St. Augustine grass. Common active ingredients effective on this disease include azoxystrobin, propiconazole, thiophanate-methyl, myclobutanil, and fluoxastrobin, among others. For example, Scotts® DiseaseEx is a granular lawn fungicide with azoxystrobin that covers gray leaf spot. Spectracide Immunox multi-purpose fungicide (containing myclobutanil) is another that lists St. Augustine lawn diseases. Liquid concentrates with propiconazole (like BioAdvanced Fungus Control for Lawns) can be used with a hose-end sprayer. When using fungicides, follow the label exactly – usually, you’ll do an initial treatment, then a follow-up 2 weeks later. It’s important to rotate fungicide classes if you need multiple applications (don’t use the same active ingredient every time) to prevent the fungus from developing resistance.
Organic or Less-Toxic Options: There are not many truly organic fungicides that are highly effective against gray leaf spot. One option is neem oil (which has some anti-fungal properties) or bio-fungicides containing beneficial microbes (like Bacillus subtilis). These might help in mild cases or as preventatives, but for a full-blown outbreak, conventional fungicides are more reliable. However, an intermediate step is to try a product like potassium bicarbonate (sold for gardening as a fungicide) – it can sometimes suppress fungal leaf spots by creating an inhospitable surface pH on the leaf. Keep expectations realistic with these gentler treatments; they might slow the disease but not cure a heavy infestation.
Reseeding/Re-sodding Patches (If Needed): Fortunately, gray leaf spot usually doesn’t kill an entire lawn. It just makes it look awful for a while. Once the disease is halted, the grass will grow new, healthy leaves. You typically won’t need to resod unless large areas thinned out or died. In severe cases where you have big dead patches, you can plug or sod those spots after the disease is under control. Make sure to clean up and dispose of any heavily infected clippings or debris so they don’t reintroduce spores.
Gray leaf spot can be a recurring issue each summer, so remember these tips year to year. By keeping your St. Augustine grass on a good maintenance program and being proactive during the hot, humid season, you can often prevent this disease or stop it early before it causes major damage.
Take-All Root Rot (TARR)
Identification and Symptoms of TARR in St. Augustine Lawns
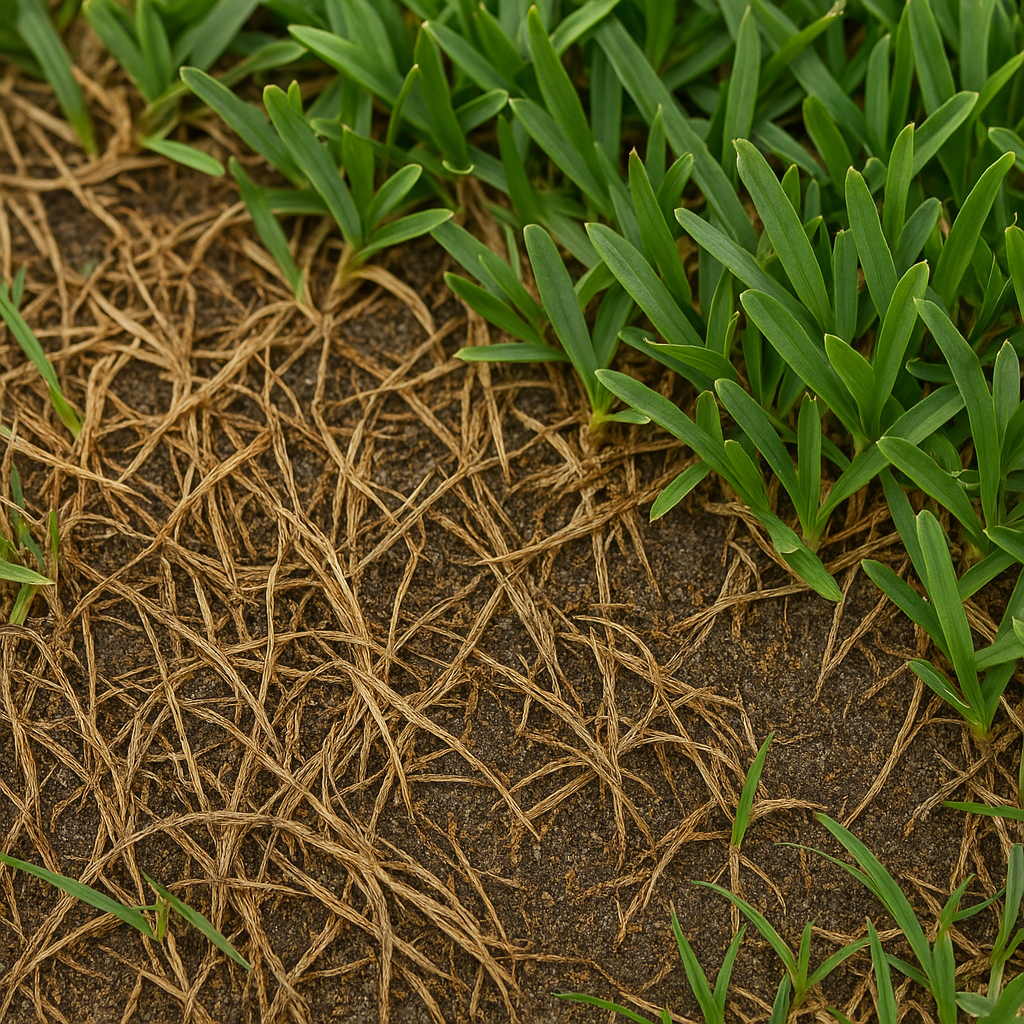
Take-All Root Rot, often abbreviated as TARR, is a root disease caused by a fungus (named Gaeumannomyces graminis var. graminis). As the name suggests, it attacks the roots, stolons, and rhizomes of St. Augustine grass, literally “taking all” the vigor out of the plant. Unlike leaf diseases that show obvious spots, TARR is a bit sneakier: the above-ground symptoms can resemble nutrient deficiency or drought stress.
You’ll typically see patches of weak, yellow, and thinning grass. The grass in those areas might appear stunted, with chlorotic (yellow) leaves that have interveinal yellowing (the veins might remain a bit green). Over time, these patches can turn brown and the grass can die off, leading to thin or bare areas. The patches can be somewhat circular or irregular and can be a few feet across or much larger, often merging into big sections of declining turf.
One hallmark is that if you tug on the affected grass, it often comes up easily because the roots are rotten and sparse. Healthy St. Augustine roots are normally off-white and fairly thick; in a TARR-affected lawn, roots will be dark, blackened, and very short or largely missing. Often, the problem becomes noticeable in spring or early summer when the lawn should be greening up vigorously but instead looks patchy and weak in places.
Conditions and Causes of TARR
Take-All Root Rot tends to flare up when conditions favor the fungus and stress the grass. In Florida, this disease is often observed in the cooler, transitional seasons – spring and fall – rather than the middle of summer. It’s most active when soil temperatures are moderate (not hottest summer) and when moisture is abundant. For instance, an outbreak might occur in spring following a cool, damp winter, or in late fall after the summer rains.
High rainfall or excessive irrigation encourages TARR because the fungus loves wet soil. St. Augustine grass that has been weakened by other factors (nutrient deficiencies, drought, or previous stress) is more vulnerable. Interestingly, TARR is often worse in alkaline soils (high pH), which are common in South Florida’s limestone-based soils or where a lot of shells/stone in soil.
High pH can tie up certain nutrients, further stressing the grass and favoring the fungus. Lawns that have been overtreated with certain fungicides or herbicides might also have reduced beneficial micro-organisms, giving TARR fungi an upper hand (this is more a theory – basically anything that disturbs soil balance can affect disease severity). In short, TARR pops up when you have a perfect storm of susceptible grass, a hungry pathogen, and an environment of moisture + stress.
Prevention TARR in St. Augustine Lawns
Take-All Root Rot can be really destructive, so prevention is crucial. Once it’s in your lawn, it’s hard (but not impossible) to manage, so you want to avoid giving it an edge. Here are preventive measures to keep TARR at bay:
Mind Your pH: St. Augustine performs best around a soil pH of ~6.5. In many South Florida yards, the pH can creep up near 7.5 or 8 (due to marine sediments or coral rock in the soil). High pH makes it easier for Take-All to invade. You can get a soil pH test (through your local extension office or DIY kit) to see where you stand. If your pH is high (above 7), consider applying elemental sulfur or soil acidifiers as recommended to gradually lower the pH. An acidifying fertilizer (like one containing ammonium sulfate) can also help bring pH down over time. A slightly more acidic soil environment can suppress the Take-All fungus and help the grass access nutrients like iron (which keeps it green and healthy).
Fertilize and Lime Wisely: Avoid over-liming your lawn (many South Florida lawns never need lime due to already high pH). Use a balanced fertilization program – ensure your lawn gets not just nitrogen, but also adequate potassium (K) which promotes root health, and minor nutrients like iron and manganese. Often, extension agents recommend using a lawn fertilizer with a 1:0:1 or 2:0:1 ratio (N:P:K) for lawns prone to root rot, with added micronutrients. A healthy, well-nourished root system can fend off disease better.
Water Management: This is big – do not keep the lawn excessively wet. Follow good irrigation practices: water deeply but only when the grass starts to show it needs it (slight wilting, bluish-gray hue, or footprints remaining visible on the lawn). Avoid daily watering. In cooler seasons or shady areas, you might only need to water once every 10-14 days, if at all, thanks to rainfall. Good drainage is vital; if you have low spots where water puddles, try to improve them (fill in depressions or adjust sprinklers). Excess moisture is like ringing the dinner bell for root rot fungi.
Reduce Stress & Chemical Impacts: Keep foot traffic minimal on stressed lawns, especially when soil is wet (to avoid soil compaction). If you’ve had TARR issues nearby, be cautious with herbicides – use only what’s needed and according to label, because some reports suggest that repeated use of certain herbicides can predispose lawns to Take-All by weakening the grass. Also, avoid using fungicides unnecessarily; killing off harmless soil fungi might give the pathogenic ones more room (a diverse soil microbiome often keeps bad actors in check).
Organic Topdressing: A well-known homeowner tip (supported by some turf researchers) for Take-All Root Rot is to topdress the lawn with sphagnum peat moss. Peat moss is very acidic. Applying a thin layer (about 1/4 inch) of peat over the lawn and raking it in can acidify the surface and upper soil a bit and also add organic matter that encourages beneficial microbes. Peat has been shown to suppress Take-All Patch in some cases. Typically, this is done in spring or fall each year if you’re in a high-risk area for TARR. It’s a somewhat labor-intensive preventive measure but can yield results over time by improving soil health and lowering pH locally around the roots.
Treatment and Management of TARR in St. Augustine Lawns
Once Take-All Root Rot has taken hold, you’ll need a combination of cultural steps and possibly fungicides to get your lawn back on track. Here’s how to deal with an active TARR issue:
Cultural Corrections (Immediate): Implement all the prevention steps you might have missed. For example, if you discover TARR during a rainy period, cut back watering completely and let nature do its thing. If you suspect high pH or nutrient issues, apply iron or a balanced fertilizer to give the grass a nutritional boost (this won’t cure the fungus, but it helps the grass recover). Also, go ahead and put down that peat moss topdressing in the affected areas – it’s a safe, natural way to try to slow the fungus. You can do this even in the middle of an outbreak. Gently rake out very dead material to allow better penetration of treatments and water to the root zone.
Fungicides for TARR: Not all lawn fungicides are effective against Take-All Root Rot, so you need to choose the right ones. Look for products that mention Take-All Patch or Take-All Root Rot on the label (in warm-season grasses). Effective active ingredients include azoxystrobin (a popular choice), myclobutanil, propiconazole, and fluopyram, among others. Some combo products exist that target TARR. A well-known strategy is to apply a systemic fungicide like azoxystrobin (for example, in Scott’s DiseaseEx or similar products) in spring and fall as a preventative if you’ve had TARR before. If you’re treating an active case, you may need to do two or three applications spaced 3-4 weeks apart to really knock the fungus back. Keep in mind, fungicides will halt the spread of the disease, but the grass won’t magically green up overnight – it can only recover as fast as it can grow new roots and stolons. Also, always follow label rates; more is not better and can further stress the lawn.
Resodding or Patching: If large sections of your lawn have died from TARR, you might consider resodding those areas. However, do not resod with new St. Augustine grass until you’ve addressed the fungus – or the new sod might just get infected too. Treat the soil first (with pH adjustments, peat moss, fungicide, etc.), then lay fresh sod. Some experts recommend using plugging instead of full sod when replanting after TARR: plugging (planting small pieces of grass spaced out) in a grid allows you to introduce new grass gradually. The idea is that existing healthy grass or newly planted plugs can creep in once the fungus is suppressed, and you can monitor progress without investing in whole pallets of sod that might fail. If TARR keeps recurring, one drastic measure is to consider switching to a different grass species (like zoysia) in those areas, but that’s a last resort and has its own considerations.
Patience and Continual Care: Take-All Root Rot can be stubborn. Even after treatment, the lawn might take a season or more to fully fill back in. Continue with a sound maintenance regime – proper mowing, careful irrigation, and maybe yearly peat moss topdressings. Often, TARR is not completely eradicated; it’s more about keeping it suppressed and keeping the grass healthy enough to coexist with a low level of the fungus. Each year, keep an eye out in spring and fall, and if you see suspicious yellow patches starting, jump in with preventative measures quickly.
By staying on top of Take-All Root Rot with both prevention and timely treatment, you can save your St. Augustine lawn from this nasty root robber. In a nutshell: keep the roots happy, don’t overwater, and don’t let the soil get too alkaline, and you’ll have a fighting chance against TARR.
Large Patch (Brown Patch)
How to Spot Large Patch in St. Augustine Lawns
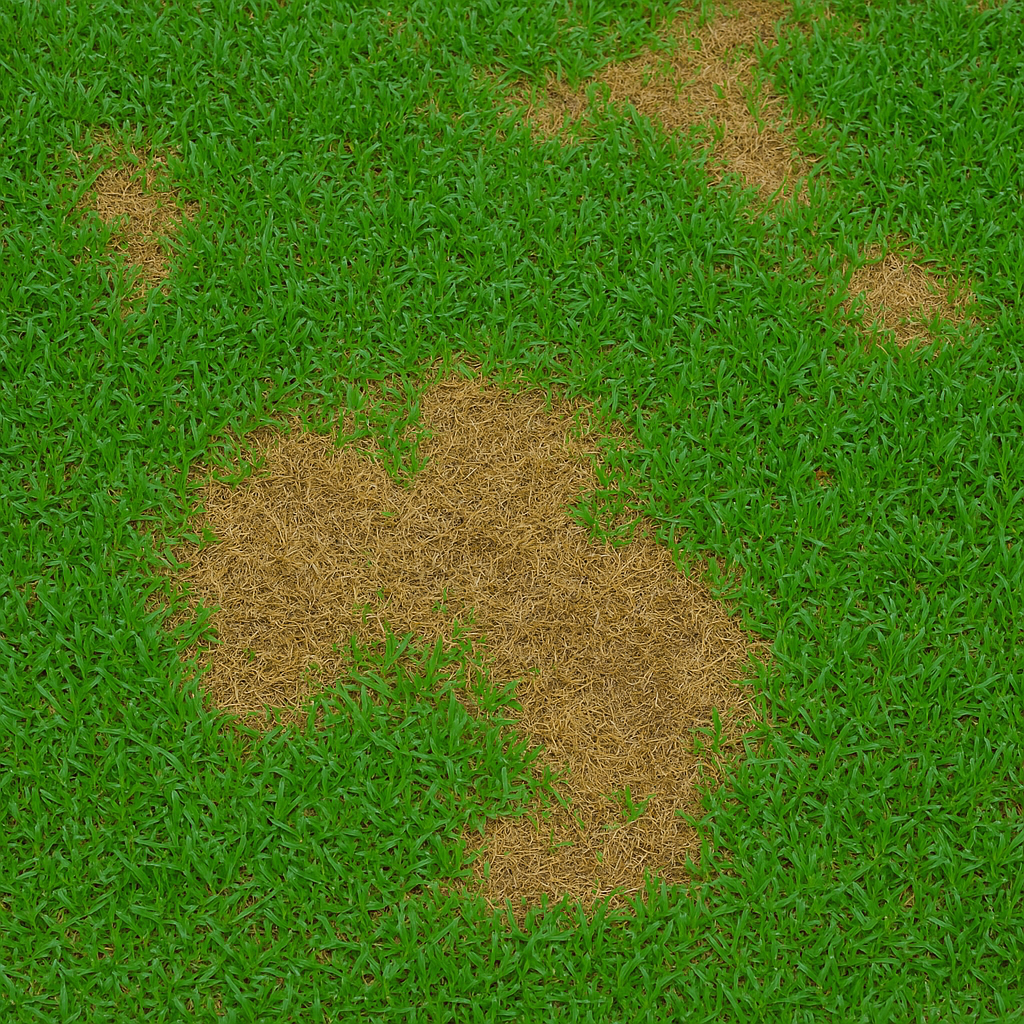
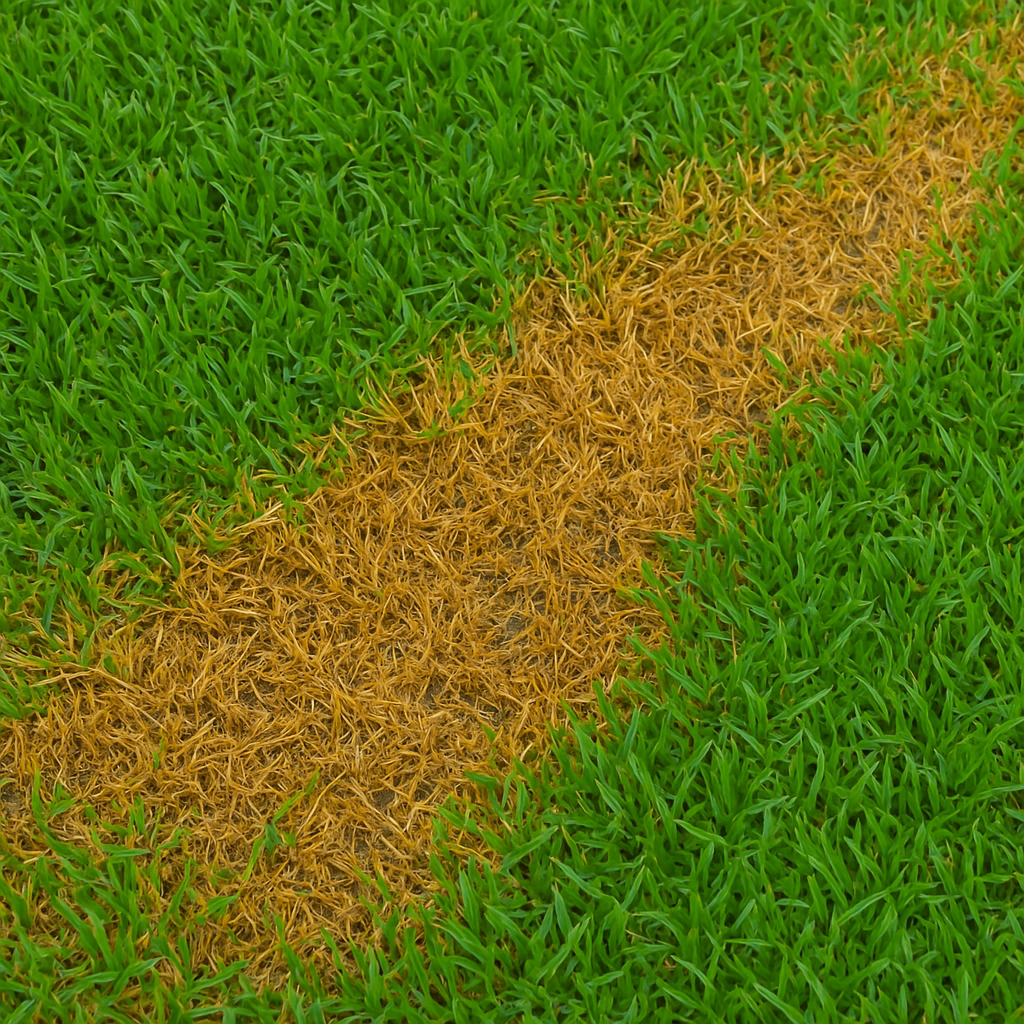
Large Patch (often called Brown Patch in cool-season grasses) is a common fungal disease that creates those ugly brown, circular patches in St. Augustine lawns. It’s caused by the fungus Rhizoctonia solani. The disease often starts as small yellowed areas (maybe a foot across) that quickly expand into larger patches, sometimes several feet in diameter. The affected grass within these patches turns light brown or tan, almost as if it’s been dried out or lightly scorched.
One distinctive symptom is that sometimes the patches have an orange or yellow “halo” or ring at the advancing edge, especially when the disease is active – you might notice a yellowish rim of grass around a brown center. If you inspect closely at the base of the grass blades in that yellow zone, you might see that the stems are dark and rotten at the bottom (and a gentle tug might cause blades to separate from runners because of rot).
The grass in the very center of a patch might actually start to recover and look green, leading to a doughnut-like appearance (brown ring with green middle) as the fungus moves outward.
However, in St. Augustine, often large irregular patches just coalesce, so you could end up with a whole lawn section looking browned out. Large Patch is sometimes confused with other issues like drought or chinch bugs or even herbicide burn, but one clue is the weather conditions when it occurs and that rotting smell or dark rot at the base of leaves.
When is Large Patch Most Common?
Unlike gray leaf spot, which loves summer, Large Patch hits when the weather is a bit cooler. In Florida, it’s typically a fall and spring disease. The Rhizoctonia fungus becomes active when temperatures start dropping below about 80°F, especially with cooler nights in the 60s and 70s and plenty of moisture.
Think October through April in South Florida as the window, with peaks in late fall and early spring. This coincides with our dry season, but even a few showers or overwatering can set it off because humidity can stay high. The disease is usually not seen in the hottest summer months. Key factors that encourage Large Patch: excess moisture and thatch. If you irrigate a lot as the weather cools down, or if we get an early fall rain spell, lawns can stay damp longer as cooler temps mean slower evaporation.
Over-fertilizing late in the season is another trigger – dumping a bunch of nitrogen on the lawn in October to “keep it green” is a bad idea, as it makes tender growth that the fungus will happily kill, and the grass isn’t growing fast enough to recover. Lawns with thick thatch and compacted soil also have more issues, as water sits and airflow is reduced, creating a perfect habitat for fungus to thrive at the base of the grass.
Also, if you’ve had Large Patch before, the fungus is likely still lurking in the soil, waiting for the right conditions to strike again, as it can survive the summer in a dormant state.
Preventing Large Patch Fungus
Keeping Large Patch out of your yard involves adjusting your lawn care as the seasons change and maintaining good practices year-round. Here’s what to do to prevent those brown circles:
Watch the Nitrogen (Again!): Similar to gray leaf spot prevention, you need to be careful with late-season fertilizing. Avoid high-nitrogen applications in the fall when nights start cooling. If you fertilize in early fall, use a slow-release formula and maybe lean more on potassium (the third number on the fertilizer bag) to promote hardiness. In late fall or winter (in South Florida many lawns don’t go fully dormant, but growth slows), it’s usually best to hold off on fertilizing until spring. Feeding the lawn when it’s not actively growing just feeds the fungus.
Irrigate Appropriately: As the weather cools or when your lawn’s growth slows, dial back the watering schedule. In South Florida, we often get our driest weather in winter, but grass also needs less water then. So you might go from watering 2-3 times a week in summer to maybe once a week or every other week in winter, depending on rainfall. Always water in the morning hours. And absolutely avoid watering in the evenings when a cool night is on the way; that’s a recipe for leaf wetness lasting 12+ hours, which Large Patch loves. If you see dew on the grass regularly, you might not need to water at all until that dew pattern changes.
Mow and Clean: Continue to mow the lawn as needed in fall, keeping that 3-4 inch height. Do not let the grass get extremely long going into winter – people sometimes stop mowing thinking a taller lawn will protect against cold or drought, but long grass can mat and stay wet, encouraging fungus. Also, if you’ve had any suspect areas, try to mow those areas last and wash off your mower deck afterwards. This might sound tedious, but it can help avoid spreading the fungus to other parts of the yard (Rhizoctonia can hitchhike on clippings). Removing clippings or at least not blowing them all over the lawn when disease is active can help isolate the issue.
Thatch and Drainage: Keep an eye on thatch – if your St. Augustine has built up a thick layer (over 1/2 inch), consider a fall dethatching session or core aeration to improve it. Aeration (poking holes) in early spring or late summer can improve drainage before the prime Large Patch season. Good airflow and drainage in the soil will reduce the time grass stays wet at the base. If certain areas always get Large Patch, check how water flows or sits there; you might need to improve grading or drainage in that spot.
Treatment for Large Patch Fungus
If despite best efforts you see those ominous brown patches forming in the cooler months, it’s time to take action. Large Patch can spread and linger for months if not treated, since the grass isn’t growing fast enough in cool weather to “outgrow” the damage. Here’s how to handle an outbreak:
Apply Fungicide at First Signs: Early intervention is key. At the first hint of yellowing patchy areas in fall, especially if you’ve had the disease before, consider applying a fungicide labeled for Brown Patch/Large Patch. Common effective fungicides include azoxystrobin, flutolanil, pyraclostrobin, propiconazole, and thiophanate-methyl. Many of these are in products marketed for lawn fungus control. For example, azoxystrobin (Scotts DiseaseEx) works on Large Patch, and flutolanil is found in some specialty lawn fungicides for Rhizoctonia. Liquid fungicides with propiconazole or myclobutanil can be applied via hose-end sprayer too. Follow the label; usually you’ll need to retreat in 2-4 weeks. In a persistent case, professionals sometimes do a fall application and then a preventive spring application as well, because Large Patch can reappear in spring from the same spots.
Spot-Treat vs Whole Lawn: If the disease is only in one area, you can treat just that area plus a margin around it. But often, by the time you notice, spores are probably present elsewhere. It might be worth treating the entire lawn if conditions are ripe for it. This is especially true if a cool, wet period is forecast – better to be safe than have more spots pop up.
Avoid Overlapping with Herbicides: If you put down a fungicide, try not to stress the lawn in other ways at the same time. For example, don’t apply a herbicide for weeds in the same week unless the fungicide label says it’s okay. The grass is already under pressure from disease; doubling up chemicals can sometimes make it harder for the grass to recover.
Minimal Traffic: Stay off the patches as much as you can. Walking on wet, infected grass can spread it. Also, the grass blades are easily detached because of the rot at the base, so walking can tear up the turf.
“Reseeding” or Repair: St. Augustine grass doesn’t produce viable seed, so “reseeding” isn’t an option; recovery is through its stolons. In cool weather, that recovery is slow. You usually won’t patch with new sod in winter because it may not establish well under disease pressure and cool temps. The strategy is usually to arrest the fungus with fungicides, let the lawn get through the winter, and then in spring, reassess. Many times, you’ll see those brown patches green back up around the edges as the grass starts growing in late spring. If some spots stay bare, you can patch them with sod or plugs at that time. If you do patch earlier, be sure the disease is fully controlled first, or the new sod can get infected too.
Follow-Up: Remember that Large Patch likes to come back in the same places. So next fall, really be on guard in those areas – perhaps do a preventative fungicide application at the start of fall in the known trouble spots. It’s much easier to prevent those big circles than to deal with them after they appear.
Overall, Large Patch is one of those things that if you garden or lawn-care in Florida long enough, you’ll probably encounter. But with mindful care and timely treatment, you can keep your lawn mostly free of those unsightly patches. And fortunately, St. Augustine can recover well from it with a little help and the return of warmer weather.
Using Herbicides Not Labeled for St. Augustine Grass
What Happens and Why It’s a Problem
St. Augustine grass, as wonderful as it is in Florida’s climate, can be a bit of a diva when it comes to herbicides (weed killers). Using a product that isn’t specifically labeled as safe for St. Augustine can lead to chemical burn or outright death of your grass.
Homeowners might unknowingly apply a popular weed control product (maybe something a neighbor recommended or a general “lawn weed killer” from up north) only to find their lawn turning yellow or brown a week later. The manifestations of herbicide injury can vary: you might see yellowing (chlorosis) of the whole lawn, brown dead patches similar to disease, or even a weird mottling or burning on the grass blades.
In mild cases, the grass tips look “fried” or growth is stunted. In severe cases, large sections of turf can die. An example scenario: using a herbicide containing Atrazine can be effective on St. Augustine for weeds, but if you accidentally use the wrong concentration or apply it during high heat, you can damage the lawn. Or maybe someone grabs a bottle of “crabgrass killer” that’s meant for fescue or Bermuda lawns – many such products contain chemicals (like MSMA or certain sulfonylureas) that St. Augustinegrass cannot tolerate and will kill it.
Even using too high a dose of a normally safe herbicide can cause problems; St. Augustine is more sensitive than tougher grasses like Bermuda.
Examples of Herbicide Misuse
This issue usually arises from misreading labels or lack of knowledge. New Florida homeowners from out of state are particularly prone – they might assume all grasses are the same and use the same weed-n-feed they used on their old lawn.
Florida stores often carry “Southern Lawn” formulations of herbicides tailored for St. Augustine and other warm-season grasses, but generic products are also on shelves. Some folks also think “more is better” and put extra concentrate in, which can burn the lawn.
Another cause is using a herbicide in the wrong conditions: for instance, 2,4-D (a common broadleaf weed killer) can be used on St. Augustine at the correct dilution, but if you spray it on a 95°F afternoon, the chemical volatizes and can nuke your lawn (and your neighbor’s). So temperature and timing matter. Floratam St. Augustine variety has some specific sensitivities too; certain products explicitly say “not for use on Floratam” (some older formulations of herbicides had that warning, because Floratam showed sensitivity).
Additionally, using non-selective herbicides like glyphosate (RoundUp) or Diquat directly on the lawn will kill whatever they touch – they’re only meant for spot-treating by carefully targeting weeds or edging, but some people mistakenly spray them broadly. Essentially, the wrong product, wrong rate, or wrong timing = bad news for St. Augustine.
Preventing Herbicide Injury in St. Augustine Turf
The mantra here is “Read the Label” – but let’s break down how to avoid herbicide disasters on your St. Augustine lawn:
Use Products Labeled for St. Augustine: This is rule #1. When buying any weed control product, check that the label specifically mentions St. Augustine grass (and even your variety, like Floratam). For example, many “Southern Weed & Feed” products contain Atrazine and are formulated for St. Augustine and centipede lawns. Herbicides like Atrazine, Sethoxydim, Imazapyr/Imazaquin (for certain weeds), and some 2,4-D blends at low rates are commonly labeled safe for St. Augustine. A product like Image® (active ingredient imazaquin) is labeled for St. Augustine to control tough weeds like dollarweed and sedge. Celsius WG and Blindside are specialty herbicides that pros use which are safe on St. Augustine for a broad range of weeds. If a product doesn’t explicitly say it’s for St. Augustine or “southern lawns,” assume it’s NOT safe.
Avoid “All-Purpose” Weed Killers: Many products marketed for generic lawns (especially those sold outside the Southeast) might contain things like dicamba, MSMA, or high concentrations of 2,4-D. These can damage St. Augustine. Always choose the version that says for Southern Lawns. If a garden center employee recommends something, double-check the label yourself, because they might not realize you have St. Augustine.
Spot Treat Carefully: If you have only a few weeds, consider spot-treating just those weeds with a small spray or even by hand applying (some folks use a wick or foam brush to dab a little herbicide on individual weed plants). This minimizes how much chemical hits your desirable grass. When spot-treating, you can also use physical barriers like a piece of cardboard to shield your grass while spraying a weed, especially if you’re using something non-selective like RoundUp on, say, a clump of torpedograss.
Mind the Weather: Even if you have the correct product, apply it under the right conditions. Do not apply herbicides when it’s extremely hot (above 85°F is a common caution on labels) or when the lawn is drought-stressed, as the grass will absorb more chemical and is already vulnerable. Windy days are also a no-go, to prevent drift onto other areas (or your neighbor’s ornamentals). Early morning or late afternoon on a mild day is often best. Also, if rain is expected within a few hours, you might waste the product (and potentially have it run off).
Test in a Small Area: If you’re unsure about a product, you can always do a little test: apply it to a small inconspicuous patch of your lawn according to directions, and wait a week to see if any damage occurs. If that spot yellows or browns, you’ll know not to use it on the whole lawn.
Fixing Herbicide Damage
Let’s say the unfortunate has happened – an inappropriate herbicide was used, and now your St. Augustine grass is hurting. Here’s what you can do to mitigate the damage:
Irrigate Heavily (Flush it Out): As soon as you realize a wrong or overly strong herbicide was applied, water the lawn deeply and repeatedly (as long as the product isn’t one that is activated by water like a weed-and-feed granular – but in the case of liquid misapplication, flushing is good). The goal is to dilute the chemical in the soil and flush as much of it past the root zone as possible. This can sometimes reduce the impact if done quickly.
Activated Charcoal (in severe cases): This is a more extreme remedy, usually used by golf course managers, but if a very harmful chemical was spilled or applied, spreading activated charcoal (available at garden centers) over the area can help neutralize and absorb the herbicide in the soil. It’s not common for home lawns, but it’s a trick to know.
Hands Off and Assess: Often, herbicide damage looks worse a few days in and then the lawn might slowly recover if the grass wasn’t outright killed. Give it a couple of weeks of gentle care (normal watering, no further chemicals) to see if new green shoots emerge. St. Augustine has stolons that might survive even if the leaves died. If you see green new growth, the grass is recovering. You can help it along with a light fertilizer application after you see recovery starting (don’t fertilize a totally brown lawn – it won’t absorb it when it’s dormant/dead and could further stress it).
Resod or Plug Dead Areas: If parts of the lawn are completely dead (you see no green after a few weeks and the runners themselves are brown and brittle), those areas will need to be replaced. Rake out the dead thatch, water the soil to flush any remaining herbicide, and lay new St. Augustine sod or plugs. Because you now know herbicides can be risky, when controlling future weeds in those new areas, stick to safe products or non-chemical methods until the sod is well established.
Weed Invasion Watch: Ironically, a side effect of herbicide damage is that in the process of killing your grass, you might have also temporarily eliminated the weeds – but weeds love bare spots, so you might get new weed seedlings in the damaged patches. Be prepared to address those, ideally by repairing the lawn quickly so the grass fills in and crowds out new weeds.
The silver lining of making an herbicide mistake is it’s a lesson learned you likely won’t repeat. The key is to always double-check what you’re putting on your lawn. When in doubt, ask an expert (like your county extension service or a trusted lawn care professional) for guidance on weed control for St. Augustine. They can recommend the right products for your specific weed issue that won’t harm your grass.

Mosaic Virus (Floratam Variety)
Mosaic Virus and Floratam St. Augustine Grass
Mosaic virus in St. Augustine grass – this is a relatively new menace that has specifically hit the popular ‘Floratam’ variety in Florida. The disease is caused by the Sugarcane Mosaic Virus (SMV), and when it infects Floratam St. Augustine, it often leads to a condition called Lethal Viral Necrosis (LVN).
Essentially, it’s a virus that systemically infects the grass and can slowly (or sometimes pretty quickly) kill large areas of the lawn. The name “mosaic” comes from the symptom pattern: you’ll see St. Augustine grass blades with mottled yellow and green patches or streaks, almost like a mosaic or patchwork of colors. Instead of a uniform green, the blade has broken yellow streaks or spots, sometimes elongate, sometimes more blotchy.
As the disease progresses, those blades can develop dead (necrotic) areas and the grass begins to thin out and turn brown in patches. Often it starts subtly – you might just see a little off-color mottling and maybe a general lack of vigor. But over months, infected areas fail to thrive, become sparse, yellow, and then die off.
Floratam is particularly susceptible, meaning the virus can cause extensive damage in that variety. Other St. Augustine cultivars (like ‘Palmetto’ or ‘Citrablue’) might also get the virus but typically show milder symptoms or are able to coexist with it longer. If a Floratam lawn is infected, it may decline over a year or two to the point of needing replacement.
How Mosaic Virus Spreads and Conditions to Watch For
Sugarcane Mosaic Virus was first noted in Florida in sugarcane crops and then occasionally in St. Augustine decades ago, but it wasn’t a big problem until around the 2010s when cases in turf became more widespread, especially in South Florida (areas like Palm Beach and Pinellas counties had early outbreaks).
The virus is thought to spread through infected plant material and possibly insects. One likely vector is certain species of aphids, which can carry the virus from plant to plant as they feed (just as they do in crops). Lawn maintenance practices can also spread it: when you mow an infected lawn and then go mow a healthy lawn, the virus can hitchhike on clippings stuck to the mower or even on the mower blades through sap. People walking between lawns can move it on their shoes if clippings stick. There isn’t evidence that it spreads via seed (St. Augustine is vegetatively propagated anyway) or by soil per se – it’s mostly by grass-to-grass contact or intermediate carriers.
Conditions that allow it to take hold are simply having the susceptible host present (Floratam grass) and the presence of the virus in the vicinity. There’s not really an environmental condition like “humidity or temperature” that makes mosaic virus more likely – it’s all about whether the virus is introduced. However, a stressed lawn might succumb faster, so general poor lawn health could make symptoms worse.
The bottom line is, if you have Floratam St. Augustine in an area where mosaic virus is active, there’s a risk of infection. South Florida has unfortunately become a hotspot for this virus, likely due to our year-round growing season which allows continuous spread.
Preventing Mosaic Virus in St. Augustine Lawns
Preventing a virus is trickier than preventing pests or fungus, but there are still steps you can take to reduce the chance of mosaic virus devastating your lawn:
Choose Resistant Varieties: If you’re establishing a new lawn or if you’re in an area known to have mosaic virus cases, consider planting a St. Augustine variety other than Floratam. As beloved as Floratam is (for its vigor and chinch bug resistance historically), it’s extremely vulnerable to this virus. ‘Palmetto’, ‘BitterBlue’, ‘Seville’, or ‘ProVista’ are alternatives that have shown more resistance or tolerance to the virus. They might get some mosaic symptoms but usually don’t die off as Floratam does. Zoysia grass is immune to this virus (different species entirely) – an option if you ever decide to switch grass types, though that’s a big step. In sum, diversify or avoid the known-susceptible cultivar in high-risk regions.
Certified Sod and Plant Material: When buying sod or plugs, make sure they come from a reputable supplier. There was concern that some sod farms might be unknowingly selling infected Floratam. Many growers now test and ensure their stock is virus-free. Don’t ever transplant pieces of grass from a lawn that might be infected to a new area. Start clean to stay clean.
Sanitation of Mowers/Tools: If you use a lawn service, talk to them about mosaic virus – good companies are aware of it. They should sanitize their mowers (with a bleach solution or other disinfectant) when moving between properties, especially if they’ve cut a lawn known or suspected to have the virus. If you mow your lawn yourself and also help a neighbor or vice versa, be cautious. Wash off lawn equipment between lawns, and ideally cut virus-free lawns before touching any that might have an issue. It sounds tedious, but this is how the virus likely leaped from lawn to lawn in neighborhoods.
Control Aphids and Insects: It’s not a guarantee, but since aphids are suspected vectors, keeping sucking insect populations in check could reduce transmission. St. Augustine isn’t usually hammered by aphids like some plants, but occasionally you might see them. A light insecticidal soap or a general landscape insect control could be used if you notice an aphid issue on the grass or surrounding ornamentals.
Observation: Early detection won’t save an already infected lawn (no cure), but it can help prevent spread. If you notice mosaic-like symptoms in your grass, you can halt any sharing of lawn equipment with others, and inform any lawn care workers to take precautions. Also, you might avoid moving sod or clippings from that area elsewhere. Being a vigilant lawn sleuth can protect your neighbors’ lawns too.
How to Manage and Treat Mosaic Virus in St. Augustine Lawns
Unfortunately, and this is the bad news, there is no chemical cure for a virus in grass. Fungicides, insecticides, etc., do not touch a virus. So dealing with mosaic virus is more about management and recovery approaches:
Assessment and Confirmation: If you suspect your lawn has mosaic virus (the mottling can resemble some nutrient issues, though usually it’s distinctive), you might want to get it confirmed. The University of Florida has a Plant Diagnostic Center, and some county extensions can help identify it. Confirmation might involve sending in a turf sample.
Knowing for sure can guide your next steps (so you don’t, for example, waste money on fungicides thinking it’s a fungus).
Short-Term Lawn Care: Lawns with mosaic may linger for a while. Some patches might look yellow, others green. You can try to maintain the lawn’s health as much as possible to see if it can live with the virus. That means proper watering, proper fertilizing (don’t overfertilize, as it won’t “fix” a virus, but do give it enough nutrients to sustain what healthy tissue remains). Sometimes cooler weather will slow the virus spread and the lawn might partially recover in winter/spring before heat stresses it again.
Overseed (Temporary Aesthetics): In northern Florida, people sometimes overseed lawns with ryegrass in winter for green color. In South Florida, that’s less common (and rye can bring its own diseases), but if a lawn is a complete eyesore from virus by fall, a homeowner might toss some annual ryegrass seed out in early winter to get a green lawn through the cool season, planning to then renovate in spring. It’s not actually solving anything, just a cosmetic patch.
Replace with Resistant Grass: Ultimately, the recommendation for a Floratam lawn with lethal viral necrosis is to replace it with a different variety or species. If large portions are dying, it’s better to start fresh. Remove the old sod (since it’s infected) and re-sod with, say, ‘Palmetto’ St. Augustine, which has shown better resistance. Or consider switching to a different grass like zoysia or bermuda if that suits your maintenance style (keeping in mind they have their own care differences). When you do replace, be meticulous: clean up all old clippings and debris, and ideally wait a brief period, watering the soil to maybe let any virus-carrying clippings decompose, before laying new sod. The new sod could still get infected if a bit of old infected material is in the soil and gets moved onto the new grass, but using a more resistant variety means even if it gets some virus, it won’t necessarily die off.
Professional Help: This particular issue is a good time to consult professionals. A lawn care expert or extension agent can advise on the best replacement varieties that are currently doing well in your area (new cultivars keep coming). Also, professionals might have access to the latest info – for instance, if any experimental treatments or management techniques are emerging (currently none can cure it, but they might know local patterns of spread).
Avoid St. Augustine for a While (If Practical): This is a bit extreme, but some folks have chosen to not replant St. Augustine at all in virus-hot areas. They might opt for a different turfgrass or landscape solution for a couple of years, in hopes the virus pressure dies down. Since the virus also affects some other grass genera (like bermuda and bahia can technically carry it, though they usually don’t show as badly), swapping to a completely different plant type (like groundcover beds or artificial turf for a bit) would be the only surefire way to not risk it – however, most homeowners want a real lawn, so this is rarely done except in severe cases.
Mosaic virus in St. Augustine is a tough pill to swallow because we can’t just spray something and fix it. It’s a reminder that even our lawns can get “sick” in a way that requires more than a quick remedy.
The best approach is preventing its spread and choosing grasses that can fend it off. If you love Floratam (and it is a lovely turf when healthy), be aware of this issue and keep an eye out. And if worst comes to worst, know that there are other St. Augustine varieties or solutions that can give you that green lawn again without the heartbreak.
Shade Issues
Why Shade Affects St. Augustine
One of the selling points of St. Augustine grass is that it’s more shade-tolerant than many other warm-season grasses. However, “tolerant” doesn’t mean “loves shade.” It just means it survives with less sun than, say, Bermuda grass would.
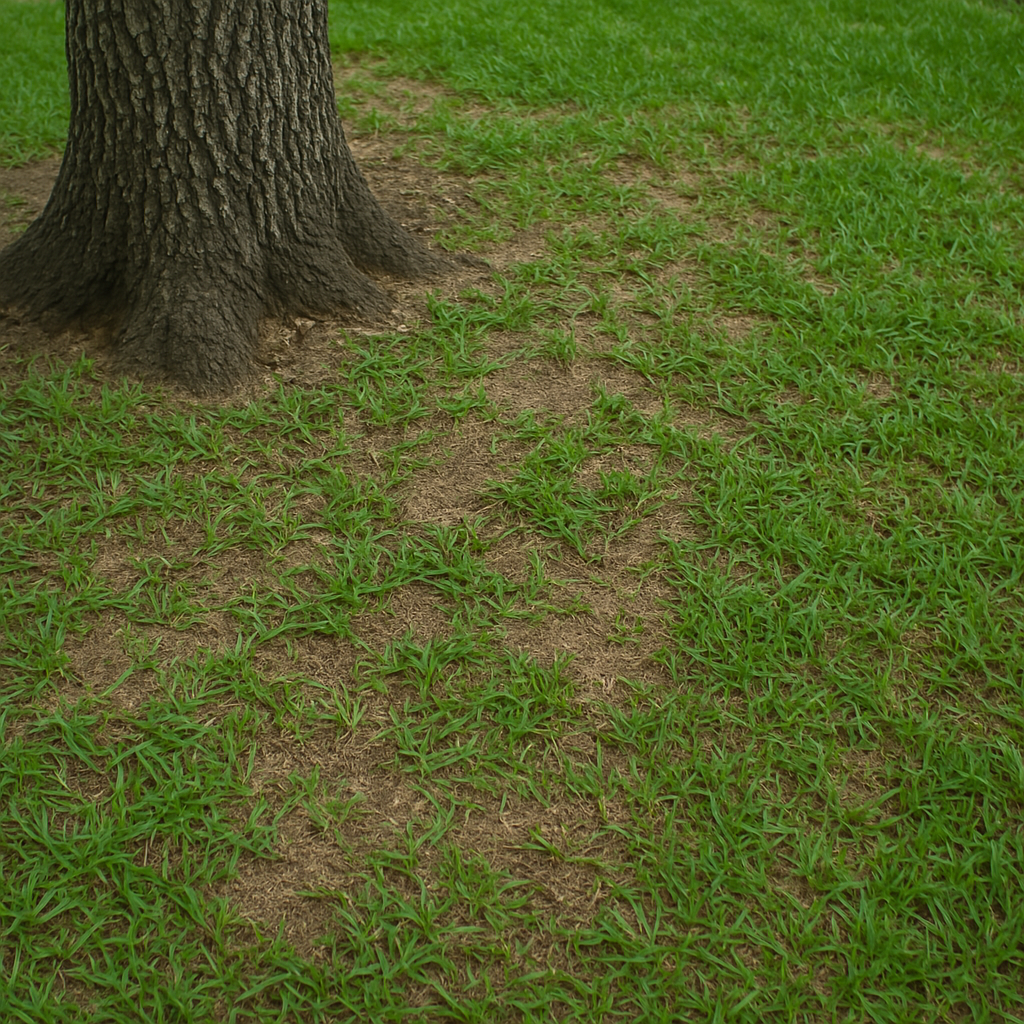
In South Florida, many homes have palm trees, oaks, or shady pool enclosures, and homeowners try to grow St. Augustine in those areas. If the shade is too dense, the lawn will start to thin out, with the grass blades growing longer, more spindly, and lighter green as they stretch for sunlight.
You might see areas where the turf that was once thick under a tree is now patchy, with more soil showing or even bare ground in spots. Also, shady lawn areas often stay damp longer (less evaporation without sun), so you might get more issues like fungus (for example, you’ll often see more Large Patch or gray leaf spot in shaded sections) or algae on the soil surface.
Moss or lichen might start appearing on the ground, which is a sign the grass isn’t dense enough to outcompete them because of low light. Weeds that tolerate shade, like certain sedges or dollarweed, may move in as the grass thins. In extreme shade, St. Augustine simply can’t sustain itself and will eventually die out, leaving a muddy or weedy mess.
How Much Shade is Too Much?
St. Augustine generally needs a few hours of direct sunlight or at least bright filtered light to do well. A common guideline is 4-6 hours of sun daily for decent growth. Some of the dwarf varieties (like ‘Seville’ or ‘Delmar’) claim to do okay with maybe 3-4 hours. Floratam actually requires more sun (it’s one of the least shade-tolerant St. Augustines, needing closer to 6+ hours).
So if you’re trying to grow Floratam under a big tree canopy with only specks of sunlight coming through, it’s likely to thin out. Seasonal changes also matter – an area might get some sun in winter when trees drop leaves, but deep shade in summer when the canopy is full.
Over time, if a landscape’s trees or shrubs aren’t pruned, areas that used to get sun can slip into too much shade. So shade problems often creep up gradually, and homeowners might not notice until the lawn is in pretty bad shape.
Preventing Shade Problems in Your St. Augustine Lawn
You can’t completely “cure” a shade issue without either removing the shade source or changing the groundcover, but there are ways to help St. Augustine cope or to make the most of what light is available:
Select Shade-Tolerant Cultivars: If you know you have a shady yard, choose a St. Augustine variety bred for shade. ‘Seville’, ‘Palmetto’, ‘BitterBlue’, and ‘Delmar’ are known for better shade performance than Floratam. They have finer blades and can maintain density with less light. If you’re sodding a new lawn or overseeding (with plugs) into an area that struggled, picking one of these might improve longevity.
Prune for Light Penetration: Take a look at the surrounding landscape. Thin out tree canopies to allow dappled sunlight through. Raise the canopy of trees by trimming lower branches (this can dramatically increase morning or late afternoon sun hitting the grass). If you have large shrubs or hedges, keep them trimmed at a reasonable height or spaced a bit farther from the lawn so they’re not casting wide shadows. Not only does this help grass, but many trees benefit from a good thinning for their own health, and you reduce risk in hurricanes by letting wind through. Always prune cautiously – you don’t want to “lion-tail” oaks or butcher a tree, but strategic trimming can add an hour or two of sun to the grass.
Water Less in Shade: Shady areas don’t dry out as fast, so they need less water. Overwatering a shaded lawn area will just encourage root rot and fungus since the grass’s photosynthesis (and thus water usage) is limited. You might cap off or adjust irrigation heads under dense shade, or water those zones half as often as the sunny zones. A good practice is to water when the grass indicates it needs it (leaf blades might start to wilt or curl) rather than on a fixed schedule. Often, shaded grass can go much longer between waterings.
Mow Higher (and carefully): It’s generally recommended to mow St. Augustine high (3-4 inches). In shade, lean towards the higher end of that range. The grass needs as much leaf area as possible to capture limited light. Also, ensure your mower blades are sharp – grass in shade is already weaker, and a jagged cut from a dull blade can make it more susceptible to disease.
Reduce Competition: Tree roots often compete with lawn for nutrients and water in shaded areas. Consider root pruning (inserting a barrier or cutting feeder roots at the lawn-tree interface) if feasible, or at least ensure the lawn in shade gets sufficient fertilizer since nearby plants might be taking a lot. Just don’t overdo fertilizer, especially nitrogen, in shade because the grass won’t use it quickly and it could spur disease. A slow-release, balanced fertilizer in the growing season is best.
Solutions and Alternatives for Heavy Shade
If you’ve tried all the tweaks and the grass still refuses to thrive, it might be time for Plan B (or C):
Alternate Groundcovers: There are shade-tolerant groundcovers that can replace grass in those dark corners. For example, asiatic jasmine, mondograss (ophiopogon), liriope, ferns, or perennial peanut (in partial shade) can form a green cover where grass won’t grow. They require different care (and often less mowing), but can be attractive. You could also do a mulched bed with ornamental shade plants (like coleus, caladiums, etc.) to turn a problem spot into a landscape feature.
Gradual Transition: If only part of your lawn is very shady, you could gradually transition that section away from St. Augustine. For instance, enlarge a mulched area around a tree each year (removing some grass) until only the area under heavy shade is now a landscaped bed and the open areas remain grass. This way you still have lawn in the sunny parts and an intentional garden or mulch under the tree.
Accept Some Thinness: If the shade is moderate, you might just accept that the grass won’t be golf-course perfect there, but it will cover the ground enough. Maybe it’s a side yard that isn’t highly visible – you can live with a thinner lawn there. You’ll just need to keep an eye out for weeds, as thin turf invites them. Hand-pull weeds or treat selectively, and keep the grass that is there as healthy as possible so it can compete.
Schedule Maintenance for Shade: Recognize that a shaded lawn area might need renovation more often. Perhaps you need to replace sod under that big oak every 5-6 years after it gradually thins out. Or you plug new grass into bare spots each spring as a routine. It’s a bit more work, but some homeowners do this to maintain some grass cover. If you go this route, again, using a shade-tolerant cultivar is key and try to address the root causes of the thinning each time (prune a bit more, etc.).
In summary, shade issues with St. Augustine are common, but they can often be managed with expectations adjusted. The grass will never be as lush in deep shade as it is in full sun, but by selecting the right variety and tweaking care, you can often have a decent-looking lawn even in areas that get limited light. And where you can’t, Florida-friendly landscaping with groundcovers or mulch is a smart, low-maintenance alternative that might save you frustration (and money on sod) in the long run.
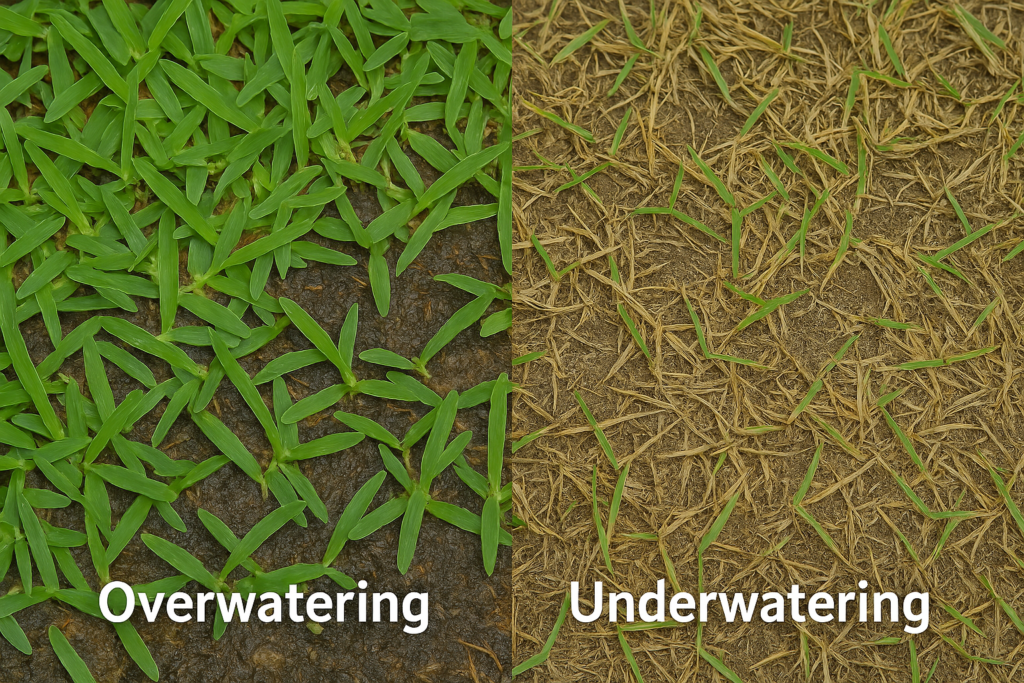
Underwatering and Overwatering
Keeping the right balance of water is crucial for a healthy St. Augustine lawn, especially in sandy Florida soils. Both underwatering and overwatering can cause problems, and sometimes it’s tricky because their symptoms can look a bit alike in the early stages. Let’s break down each:
Underwatering (Drought Stress) – Signs and Effects:
St. Augustine grass has relatively deep roots for a turfgrass (especially if it’s been watered properly), but our fast-draining sand and intense Florida sun can dry it out quickly. When your lawn isn’t getting enough water, either from lack of rain or inadequate irrigation, the grass will start to show signs of drought stress.
Early on, the blades begin to fold or roll lengthwise to conserve moisture (so instead of a flat blade, it looks like a skinny needle). The grass may take on a blue-gray tint (not as vibrant green). If you walk on it, your footprints remain visible because the wilted grass doesn’t spring back. These are subtle signs that the lawn needs water. If the drought continues, patches of the lawn will turn brown and crispy as the grass goes dormant or dies.
St. Augustine can go dormant under drought (turn brown but the stolons might still be alive and green at the nodes if you check closely). But if it’s severe, it can outright die, especially in sandy soil with no moisture. Underwatered grass is also more prone to getting chinch bug damage (as we covered, those pests love hot, dry conditions).
So you might have a double whammy: drought-stressed lawns can attract pests or become weak and get overtaken by weeds that handle dryness better (like Bahama grass or certain sedges).
Overwatering (Too Much Water) – Signs and Effects:
On the flip side, giving your lawn too much love (water) can drown it or cause other headaches. In a chronically overwatered lawn, the soil stays soggy and the grass roots don’t need to grow deep (or can’t, due to low oxygen).
You’ll often see a lawn that is shallow-rooted and weak, flopping over because the roots are all near the surface. Overwatered lawns can turn a lighter green or even yellow, because nutrients leach out of waterlogged soil (iron and nitrogen deficiencies can show up as yellowing).
You might notice mushrooms or fungus popping up (a sign of constantly moist soil). Over time, areas may develop black or slimy soil surface (algae growth) in persistently wet spots. Also, weeds that love moisture, like dollarweed (those round pennywort weeds) or sedges (which have a triangular stem and lush green look), will thrive and spread in an overwatered lawn.
One of the biggest risks of overwatering in Florida is that it sets the stage for diseases like Large Patch and Take-All Root Rot – as we discussed, both of those love wet conditions. So an overwatered lawn might suddenly get big brown patches from fungus.
Another clue of too much water is if you step on the lawn and water squishes up, or you find areas of standing water regularly after irrigation runs. Grass actually can suffocate and die if its roots are sitting in water for too long (they need oxygen too).
So ironically, overwatering can also result in brown patches – not from dryness but from root rot or suffocation.
Finding the Sweet Spot – Prevention and Best Practices:
The goal is to water just enough to meet the lawn’s needs, and not more. Easier said than done, but here are guidelines to strike that balance:
Irrigate Deeply and Infrequently: This is a golden rule. When you water, water deeply – about 3/4 to 1 inch of water in a session (you can measure this with a rain gauge or even an empty tuna can set out on the lawn to see how long it takes to fill ~1 inch). Deep watering encourages grass roots to grow further down, which helps it handle dry spells better. Then, wait until the lawn shows it needs water before watering again. In summer, that might be every 2-3 days in sandy soil; in cooler or more humid times, it could be once a week or less. Deep, infrequent watering both prevents shallow roots (overwatering problem) and ensures the lawn is quenched (avoiding drought problem).
Use a Rain Sensor or Smart Controller: South Florida weather can be erratic – monsoons one week, dry the next. If you have an irrigation system, make sure it has a working rain sensor (it’s actually required by Florida law for automatic systems). This will shut off the sprinkler if we’ve gotten rain. Even better, consider a smart irrigation controller that adjusts watering schedules based on weather forecasts and soil moisture. These gadgets take a lot of guesswork out and can prevent the all-too-common scenario of sprinklers running in the middle of a thunderstorm.
Observe and Adjust: Your lawn will tell you if it’s happy. As you fine-tune your watering, do those footprint and color checks. If you see early wilt signs, that’s your cue that next time, don’t wait quite so long to water. If you’re seeing mushrooms or algae, cut back the frequency. Break your watering into cycles if you have runoff – like water 15 minutes, pause, then 15 more, so it soaks in rather than puddling. For sandy soil, sometimes a shorter, more frequent pattern is needed, but still aim to let it dry some between.
Seasonal Changes: Adjust for seasons – in the hot wet summer, you might rely mostly on rain and just supplement in between showers. In cooler winter months, you might barely need to water at all (the grass isn’t growing much and there’s dew many mornings). Many people forget to change their sprinkler timer and end up overwatering in winter or spring. A good practice is to at least manually turn off or override the system if you know it rained or conditions are cool.
Zone Tuning: If your irrigation system has zones, not every zone may need the same runtime. A shady north-side zone might only need half the water of a sunny south-side zone. Similarly, areas with heavier soil (if any) hold water longer than pure sand. Tune each zone to its specific needs if your controller allows different schedules.
Fixing an Under Watered Lawn
If your lawn has suffered drought damage (dry, crunchy patches), here’s how to help it bounce back:
Water, But Don’t Drown: Increase your watering frequency a bit to revive the grass, but continue to water deeply. For example, if you were watering once a week and that was too little for summer, bump it to twice a week. Don’t go to everyday watering unless the lawn is extremely parched and you’re doing short bursts to moisten the soil – everyday watering long-term would create an overwatering issue. The key is consistent moisture while the grass recovers.
Repair Dead Spots: If some areas truly died (you can tell if stolons are shriveled and brittle, not just brown leaves), you may need to replug or sod those spots. St. Augustine will creep back in from the edges, but that can be slow. You can hasten recovery by plugging in some pieces of sod in the largest bare spots once the surrounding grass is healthy and being watered correctly again.
Resume Proper Maintenance: Drought-stressed grass can benefit from a nourishing feeding (assuming you’re not in the heat of summer or under fertilizer blackout dates). A balanced fertilizer application can help it grow new runners and fill in. Just ensure you have the watering sorted out first, or fertilizer could burn it if water is still lacking.
Fixing an Over Watered Lawn:
If you realize you’ve been overwatering (squishy yard, lots of fungi/weeds):
Cut Back Gradually: Don’t abruptly stop watering entirely (unless nature is providing rain). Instead, stretch out the intervals. If you were watering every day, try every other day, then every third day. The grass roots need to adjust to the new regime. They might be shallow now, so you want them to start growing deeper. It might temporarily look a little wilted as it adjusts – that’s okay, just keep an eye out to not let it fully scorch.
Improve Drainage: For persistently soggy spots, you might need to amend the soil or improve drainage. Adding organic matter (like compost) to sandy soil can actually help it retain necessary moisture but also improve overall soil structure. Ironically, pure sand drains too fast but can also hold water if compacted; compost helps balance it. In low areas, consider adding soil to level it or installing a drain if it’s a big issue.
Fungus Treatment: If overwatering led to a fungus attack (like Large Patch), you may need to treat that with a fungicide as discussed earlier, in addition to reducing water. Otherwise, the grass won’t regrow well if disease is active. Likewise, tackle any surge in weeds due to overwatering – for example, treat dollarweed or sedges with an appropriate herbicide now that you’ll be cutting off their water supply.
Aeration: Core aerating the lawn can help with overwatering issues by opening up the soil, allowing it to dry better and getting oxygen to roots. The best time to aerate in Florida is typically late spring or early summer when grass is actively growing (so it can recover quickly), but if you’re in a bind you could also do it in early fall. Aeration holes also help future water to penetrate deeper rather than puddling on the surface.
By tuning your watering practices, you’ll find that sweet spot where your St. Augustine grass is getting just what it needs. In South Florida’s climate, that often means supplementing rainfall smartly and not following a rigid schedule year-round. It’s a bit of an art, but once you get to know your lawn and soil, you’ll be able to tell when it’s time to water and when to hold off.
Remember, a well-watered (but not overwatered) lawn will be healthier, denser, and far less prone to those other issues like pests, disease, and weeds.
Knowledge is Power When it Comes to Lawn Care
Maintaining a lush St. Augustine lawn in Florida might feel like a juggling act – you’re managing insects, watching out for fungi, minding your watering, and even fighting the occasional virus or weed mishap. The key takeaway is that knowledge is power when it comes to lawn care.
By understanding what causes those brown spots or thin patches, you can take the right action (and often before things get out of hand). Remember to keep your lawn care routine flexible with the seasons – South Florida’s climate swings from sauna-like summers to drier, cooler winters, and your lawn’s needs will change accordingly.
A little preventative care goes a long way: feeding your grass appropriately, watering wisely, mowing correctly, and being observant of early warning signs will prevent most serious problems.
That said, even the most diligent DIY enthusiast can sometimes get overwhelmed or run into a mystery lawn issue. Don’t let frustration get the best of you or your lawn. If you’ve tried the tips in this guide and still find yourself staring at stubborn brown patches or persistent pests, it might be time to call in some backup. Floridist is here to help. We’re passionate about Florida lawns and have the expertise to diagnose and treat those tough lawn problems that persist. Whether it’s a one-time consultation to get you on the right track or a full-service lawn care program for year-round turf health, our team has your back. After all, sometimes you just want to kick back in your green, soft grass and let someone else handle the hard stuff.
Your St. Augustine lawn is more than just grass – it’s the welcome mat to your home and a point of Florida pride. With the knowledge you’ve gained and a little help when needed, you can keep it thick, green, and beautiful. So don’t hesitate to reach out to Floridist for professional lawn care guidance or services. We’re always ready to lend a hand (and a shovel, or a spreader, or a sprayer!) to help your lawn thrive. Here’s to a healthy, emerald-green St. Augustine lawn that will be the envy of the neighborhood. Happy lawn care, and remember – the grass can be greener on your side of the fence!